Tportable Tablesaw Support Tables With Out Feed
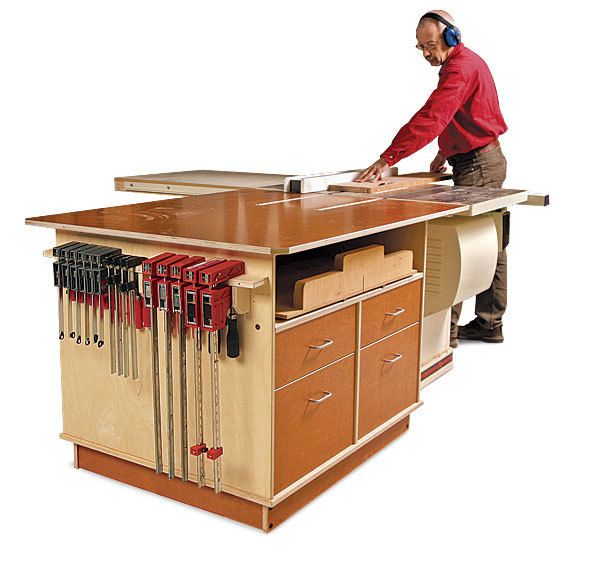
Synopsis: An outfeed table helps make tablesaw operation safer and provides a valuable workspace for assembly and finishing. But the space beneath it is often wasted. John White solves that problem with this design, which has a cabinet below it with dedicated storage areas for the rip fence, miter gauge, crosscut sled, blades, and several big drawers for jigs. There's also plenty of shelf space for general storage, as well as room on the end panels for clamps. The large phenolic-plywood top resists stains and glue, so it's perfect for assembly and finishing. It's easy to adjust the table's height and level it, too.
Best of all, this outfeed table is not difficult to build. The cabinet itself is joined by butt joints held together with screws. The drawers are joined by a rabbet-and-groove joint that requires only two tablesaw setups.
A good outfeed table is essential for safe woodworking, because it allows you to control the workpiece as it moves past the blade and off the back of the tablesaw.
Without it, you'll have to push down hard on the back of long boards, which makes it difficult to guide them safely past the blade. An outfeed table also naturally doubles as a work surface for assembly and finishing. But the space beneath the table often lies unused, a wasted opportunity for efficient storage.
This outfeed table has a cabinet below that takes advantage of that space, with dedicated storage areas for the rip fence, miter gauge, crosscut sled, blades, and several big drawers for jigs. And there's plenty of shelf space for general storage, as well as room on the end panels for clamps. The large phenolic-plywood top is great because it's so slick that materials almost float across it. And because the surface resists stains and glue, it's perfect for assembly and finishing. I let the top overhang the base for easier clamping.
It's easy to adjust the table's height and level it, too. so if you move to a new shop, you won't need a new table.
Best of all, this outfeed table is not difficult to build. The hardest part may be dealing with the large sheets of plywood, but I'll offer tips that make breaking down and squaring the material easier. All of the joinery is simple. The cabinet itself is joined by butt joints held together by screws (I'll offer pointers on assembling the joints accurately). The drawers are joined by a rabbet-and-groove joint that requires only two tablesaw setups.
Materials improve function and ease construction
This cabinet is built entirely of sheet goods, except for two Douglas-fir runners. The top, drawer fronts, and kick plates come from a single 4×8 sheet of phenolic plywood. The cabinet is 3⁄4-in.-thick Baltic-birch plywood and the drawers are 1⁄ 2-in.-thick Baltic-birch plywood.
The entire table can be made more economically from medium-density fiberboard (MDF) or ordinary plywood, but you'll have to use connecting bolts with barrel nuts to make strong joints in the softer MDF. With plywood, you can use screws. And you'll need to apply a finish to the tabletop to toughen it and seal it against stains and glue.
A guide for square panels
You can't rely on the factory-cut edges being square to each other, and full sheets are hard to handle on the tablesaw anyway. Solve both problems by using a circular saw and cutting guide to break down the sheet into smaller workpieces.
Set the guide so that it cuts an edge square to a factory edge. Use a sanding block to clean up the two square edges and then measure and mark the panel's final dimensions. Trim it to size on the tablesaw, running the square edges along the fence.
Bevel all edges on the panels with a chamfer bit. This prevents damage to the panels and adds a bit of safety. A square phenolic edge is very sharp and easily can cut you. Beveled edges also create crisp shadow lines at the joints, which I like.
Screw joints are solid
All of the table's joints, except those in the drawers, are simple butt joints held together with screws. Where they wouldn't be visible, I used drywall screws. Where the screw heads are exposed, I used joint-connector-bolt wood screws (www.mcfeelys.com, #1423-CWB), which have large, bronze-colored heads that look good on shop furniture. Although these are called bolts, they're actually hefty wood screws that need aligned clearance and pilot holes drilled before you drive them home (see photos, p. 39).
Butt joints can be hard to align and assemble, so I use a couple of tricks to make things easier. First, I mark where one-panel butts against the other. With these lines drawn, it's easy to tell where the joint is located and to drill accurate clearance or pilot holes along the centerline.
Once the clearance holes are drilled, you need to transfer their centers onto the edge of the intersecting panel so that you can drill pilot holes. But it's not easy to hold everything in alignment when you do that, so I drive a few brads into the edge lines drawn earlier to trap the panel and hold it steady while I transfer the centers. I pull out the brads with a claw hammer when the joint is together. The layout lines and small nail holes left behind are hidden inside the case.
Assemble the table in stages
I built my table in stages to avoid accumulated errors, but some parts should be cut in groups for uniformity. The cabinet's center panel can be cut at the same time as the drawer and shelf dividers because they need to be the same height.
Begin by assembling the end panels and the center panel. Once they're joined and square to one another, get the dimensions for the bottom and subtop by measuring the assembly and adding 3 ⁄ 4 in. to its width and length. The bottom and subtop overhang the core assembly by 3 ⁄ 8 in. on all four sides, which makes it easier to fit them because the alignment of the edges won't need to be exact. Attach the bottom, but not the subtop.
The drawer and shelf dividers are next. The shelf divider is simply screwed to the center panel. The back of the drawer divider, however, has a strip of plywood attached to it. Screws are then driven through the resulting flange to attach the drawer divider to the center panel (see detail, p. 38). This is necessary because once the shelf divider is installed, you won't be able to drill through the center panel to attach the drawer divider.
After the dividers are in place, install the large shelf that provides storage for the sled. When you screw it down, keep the drawer and shelf dividers square to the center panel. Next, add the divider that serves as a back to the shelf.
You're now ready to attach the subtop, which adds stiffness to the phenolic top and makes it easier to screw it on. Before you attach it, drill and countersink a series of holes for the screws that will attach the phenolic top to the base. Drill them 6 in. apart around the subtop's perimeter and about 2 in. from the edge. Do the same around the center. Now, attach the small shelf to the side of the table. To keep things simple, I screwed the shelf to a pair of cleats, which are hidden by a skirt on the front edge.
Flip over the base and attach the two runners that receive the table's lag-bolt feet. These runners are made from Douglas-fir 4x4s trimmed to 21 ⁄ 2 in. square. Drill pilot holes for the lag-bolt feet and screw them in, leaving them about 1 in. proud of the runners. The lag bolts allow you to adjust the table's height and to level it. Attach them 21 ⁄ 4 in. from the edge of the bottom.
Flip the base back over and attach the phenolic top. In addition to beveling the edges of the panel, I trimmed the two corners opposite the saw at 45º, which is easier to do with the top attached.
Next, level the cabinet and bring the top in line with the saw's table. Then transfer the location of the miter slots directly from the saw table and mark them out on the top. Mine are 1 ⁄ 2 in. deep by 1 in. wide by 205 ⁄ 8 in. long. To cut the channels, you only need a router, a straight bit, and a straightedge, but I made a template and used an offset guide bushing, which allowed me to rout the entire channel without having to adjust a straightedge to get the full width.
For dust clearance, I drilled a 3 ⁄ 4-in.-dia. hole about 6 in. from the end of each channel. The dust falls into the gap between the back of the saw and the outfeed table.
A fast drawer joint that lasts
You can build the drawer boxes in a variety of ways, but I recommend a rabbet-and-groove joint that requires only two setups on the tablesaw. These drawers are quite strong and can be made in short order.
The drawer boxes are made from Baltic-birch plywood that's just a hair under 1 ⁄ 2 in. thick, but that doesn't mean the joint is harder to cut. You'll cut all of the dadoes and grooves with the first setup, and all of the rabbets with the second (see photos, facing page). The dadoes, grooves and rabbets are cut with a 1 ⁄ 4-in. dado stack set at the same height, so you'll only need to reset the fence between setups.
The easiest way to assemble the drawers is to brush a small amount of glue on the rabbets (you want to avoid squeeze-out) and tack the joints together with two or three small brads. The brads will hold the joint snug as the glue dries. Clamping is time-consuming, and the weight and pressure of the clamps can throw the drawer out of square.
I used standard ball-bearing, full-extension slides from a home center to mount the drawers in the outfeed table.
Attach the drawer fronts and kick plate
Fit the fronts with the table in place and adjust for height and level. The table might twist a bit as a result of the adjustments, and you'll get a better fit after them.
The four pieces of the kick plate are screwed to one another at the corners but aren't attached to the cabinet. This makes them easy to remove should you need to tweak the table's height if you move the saw and table.
A few coats of shellac on the Baltic-birch plywood will give it some protection.
Your newly minted outfeed table will make your shop safer and better organized. And that will make your woodworking more enjoyable.
Precise Plywood Pieces
Use a circular saw and guide to square up factory-cut edges and to cut parts to a manageable size for the tablesaw.


Basic Anatomy
Baltic-birch and phenolic plywood combine for good looks, a sturdy base, and a low-friction top. Adjust the height shown here to fit your saw.


Joinery Tips
Careful layout of joint locations and a few well-placed brads take the fuss and frustration out of butt joints. The layout lines show you where to drill, and the brads act as a third hand to hold the panels steady as you mark screw locations.

 |  |  |


Logical Order For Assembly
Start with the center and end panels because everything else is built around them. The bottom keeps these parts square and stable while you attach the rest of the components.

 |  |

Table Tops It Off
Attach the phenolic top from below. That way, its smooth surface is unbroken except for the miter slots, which provide clearance for gauges and sleds.


Rout The Clearance Slots


Simple Joinery, Sturdy Drawers
Build the whole drawer box with just two tablesaw setups, one for the grooves and one for the rabbets.

 |  |
 |  |

Adjust The Height
The lag-bolt feet let you adjust the table to be level and just the right height.
 |  |
Cap It Off
Phenolic drawer fronts and kick plates are durable, but also give the cabinet a unified look and subtle pop.
 |  |
For the full article, download the PDF below:
From Fine Woodworking #202
View FREE Project
View PDF
Source: https://www.finewoodworking.com/project-guides/shop-projects/best-outfeed-table-for-the-tablesaw